Concepts
On this page, only relevant code snippets are shown. For a complete setup, please refer to the respective programming pages.
Kea Camera
To connect to a Kea camera we first need a serial number. Every Kea camera has a sticker indicating the serial number. Alternatively, you can locate the serial number of any available camera using the following method:
discovered_cameras = tof.discoverCameras()
for discovered_camera in discovered_cameras:
  print(f"{discovered_camera.serial()} - {discovered_camera.info()}")
This will print all discovered cameras.
To establish communication with the camera, you can construct the KeaCamera class. There are several constructors for this class. The simplest takes just the serial and will configure itself exactly like in the viewer. The second also takes a processing config and the third also takes a camera config. Both of these classes will be explained further down, but they allow for more fine-grained configuration.
cam = tof.KeaCamera("2020004")
cam = tof.KeaCamera("2020004", processing_config)
cam = tof.KeaCamera("2020004", processing_config, camera_config)
Once the camera is constructed, the desired outputs need to be configured. In the tof library this is coined as a Stream. There’s several ways to select the output streams.
# Select all Z streams
cam.setOutputFrameTypes([tof.FrameType.Z])

# Manually select streams
possible_streams = cam.getStreamList()
selected_streams = [stream for stream in possible_streams if stream.frameType() == tof.FrameType.Z]
cam.setStreamList(selected_streams)
The most interesting frame types are RAW, Amplitude/Intensity, Radial, Reflectivity, XYZ, BGR and BGRProjected.
- RAW is the unprocessed data straight from the sensor.
- Amplitude and Intensity are the amount of modulated light received by the sensor. They are practically the same, the only difference being that Amplitude is a floating point value and Intensity is its 8-bit integer equivalent.
- Radial is the distance measured before the lens calibration is applied and stored as a 16-bit integer.
- Reflectivity is the amount of light received by the sensor, corrected by the radial distance. This gives a good indication of the actual IR reflectivity of an object, although not perfect, since angle of incidence plays a big role in how much light is reflected.
- XYZ is the point cloud value of each point in space, relative to the depth sensor.
- BGR is the RGB data from the RGB sensor.
- BGRProjected is the RGB data projected to the depth sensor.
Once the streams have been selected, the camera can be started and the output data collected. The output data will be in the same order as it was set in the stream list.
cam.start()

for _ in range(100):
  frames = cam.getFrames()

cam.stop()
By default most of the depth processing happens on camera. This allows for smaller data throughput. To work with RAW data, on camera processing will need to be disabled.
cam.setOnCameraProcessing(False)
IO - CSF files
Chronoptics Streaming Format (CSF) is a file format designed for saving RAW and Depth frames to disk. They are designed in such a way that an abrupt end to the file does not invalidate the recording. The CSF file saves all the information necessary to fully reprocess captures. This allows for a single RAW capture to be reprocessed multiple times to find the best set of processing configuration parameters for your scene/application. The saved frames can be of different types, so for example, RAW and BGR frames can be mixed.
CSF files can be saved to disk using the CSF writer class.
writer = tof.CsfWriter("/file/location.csf", cam)

cam.start()
for _ in range(100):
    frames = cam.getFrames()
    for frame in frames:
        writer.writeFrame(frame)
The stored CSF file can then be read by the CSF camera class. This class works almost identically to the Kea camera class, with one major difference: a camera config cannot be set. It wouldn’t make sense to change the sensor parameters that the data was originally captured with.
cam = tof.CsfCamera("/file/location.csf")
cam = tof.CsfCamera("/file/location.csf", tof.ProcessingConfig())
Processing config
The processing config specifies which filters/processes to use for converting RAW data to depth. It can be default constructed, in which case all filters/processes will be disabled except for calibration, or it can be read from a JSON file stored on disk.
processing_config = tof.ProcessingConfig()
processing_config = tof.ProcessingConfig("/file/location.json")
The processing config is only stored on camera when using on camera processing.
Camera config
The camera config specifies the depth sensor settings. The camera config is stored on camera, so once a camera config is set, it will persist until a new camera config is set.
Recommended
The easiest way to generate a camera config is using the ConfigModes. These config modes specify a camera configuration and matching processing configuration for different use cases.
config_mode = tof.ConfigMode.LONG_RANGE_DYNAMIC_SCENE
processing_config = tof.configModeProcessingConfig(cam, config_mode)
camera_config = tof.configModeCameraConfig(cam, config_mode)
Both configuration can be set at the same time.
cam.setConfigurations(camera_config, processing_config)
Advanced
All the depth sensor settings can also be accessed directly for more fine-grained control. However, it is important to note that it is easy to make mistakes in this area, which can result in suboptimal camera performance. Therefore, it is only recommended for experts in the time-of-flight field.
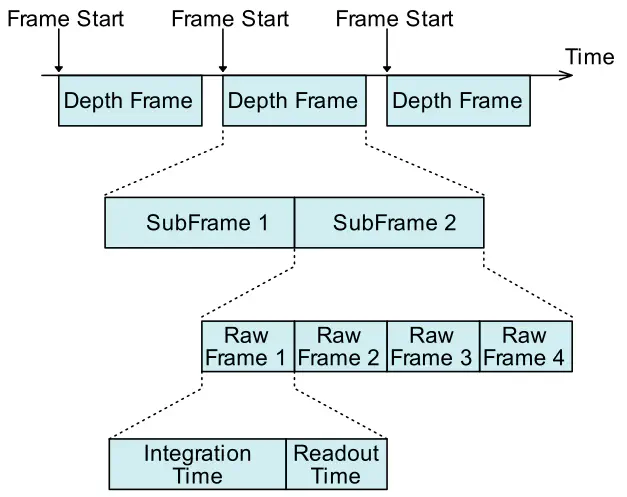
Most settings affect a single sub-frame, which is why they require a frame number to indicate the specific sub-frame to act upon.
cam_config.setModulationFrequency(0, 80.)
cam_config.setModulationFrequency(1, 100.)

cam_config.setIntegrationTime(0, [250, 250, 250, 250])
cam_config.setIntegrationTime(1, [250, 250, 250, 250])
The example above assumes a dual-frequency camera config with four phase steps.